Features
- 5V & 3.3V Compatible (A single input pin needed on Arduino or Microcontroller)
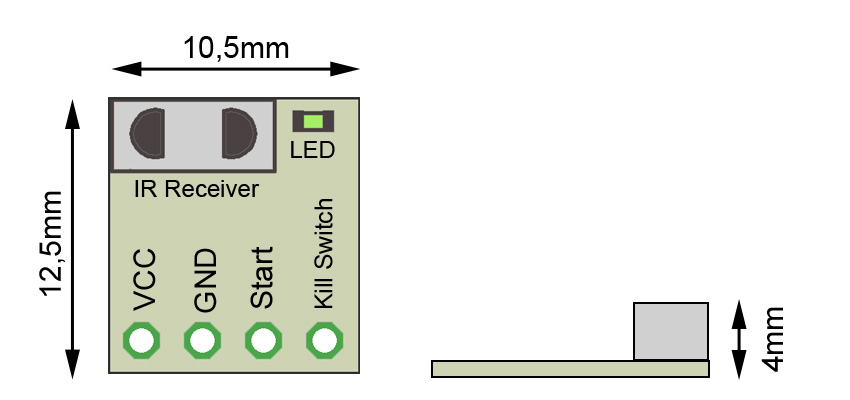
- Tiny Size (10.5mm x 12.5mm x 4 mm)
- Simple to use and quick to program
- Open source and open hardware
How to use it during competitions?
- First you need to program the module so it reacts to and remembers a specific referee remote
- Power up your robot and then the referee sends a programming signal (The LED will will blink 2 times)
- Now the startmodule is ready for receiving start and stop signal (The LED is on when started and blinks when stopped).
How to use it when testing at home?
- First you need to program the module so it reacts to and remembers the Test Remote
- Power up your robot, keep the test remote close to the module and then press the program “P” button(The LED on the module will blink 2 times)
- Now the start module is ready for receiving start and stop signal from the Test Remote(The LED is on when started and blinks when stopped).
This rest of this page describes the remote start system in the same way as it could be described in the rules.
The start module is an open source and open hardware project.
Remote start and kill switch
Every round is started by the referee sending a start signal with an IR transmitter. As soon as the robot receives the signal the round will start. (This method makes the matches fairer since it eliminates false starts and is also time saving since less restarts is needed). The contestant can choose to either implement all the hardware and software by them self or he/she can simply use a prebuilt module (recommended).
Kill switch
The kill switch is used to cut power to the motors of the robot, which is used as a security precaution and is only mandatory in the 3kg class. When the referee sends the stop command the power to the motors has to be cut. The robot builder is responsible for adding such a kill switch on the robot by themselves, however the prebuilt module can supply the signal for activating the kill switch. Examples of recommended design can be found below.
| Robot Class | 3kg | 500g | 100g | 25g |
| Remote start | Mandatory | Mandatory | Mandatory | Not applicable |
| Kill Switch | Mandatory | Optional | Optional | Not applicable |
Prebuilt module
The prebuilt module takes care of all communication and is very easy to implement. The robot only needs to wait for the start pin on the module to go high and then it should start. The module accepts supply voltage (VCC) 3.3-5V. The connectors have standard 2.54mm pitch.

Modes of operation
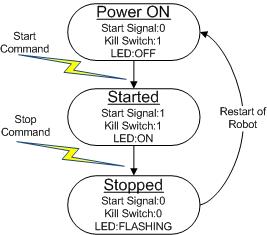
The figure below illustrates the modes of operation of the module. To be less sensitive to noise and disturbances the module will save its current state into a non-volatile memory and if it is resets it will return to the last known state. This means that each match will end with the referee sending the stop command.

Note: If the LED on the module is on before the referee has sent the start command it means that the module is in the “Started” state. Then the stop command has to be sent and the robot needs to restart for the module to go back to the “Power ON” state.
To be able to run multiple matches next to each other each dohyo will have its own unique identifier. The prebuilt module can be re-programmed to listen for a new identifier. This is done by the referee by sending a special programming command which updates this identifier.
Robots which use sensors that are based on IR technology with a 38kHz transmitter modulation are encouraged to start their sensors after the start signal is received. This is to minimize the risk of disturbance.
Explanation of use
Visit the link below where it is described how the system is intended to be used during competition, make sure to read it before the competiton.
http://www.startmodule.com/explanation-of-use/
Recommended design for Kill Switch
How to implement Kill switch circuit using a relay.
http://www.startmodule.com/kill-switch-relay/
How to implement Kill switch circuit using an optocoupler.
http://www.startmodule.com/kill-switch-oc/
How to test at home
http://www.startmodule.com/faq/home-mode/
FAQ
For answers to the most common questions regarding the start systems.
http://www.startmodule.com/faq/
How to implement everything by your own
For those who want to implement everything by their own and not use the prebuilt module a guide for this can be found at: http://www.startmodule.com/implement-yourself/
So where can I buy this? How much? And is there any code library or listing for use in Arduino kits?
Usually, these are sold for competitions. You can check which competitions use them under Used by.
The price vary depending on the competition. Somewhere around 8€ a piece.
It you use the prebuilt module, you only need to read a single input pin, which really doesn’t need a separate Arduino library.
HELLO THERE IM JORGE FROM MEXICO WE PLANING TO USE THE REMOTE IN A COMPETITION DOWN IN MEXICO CAN YOU TELL ME PLAESE WHEN IS GONNA BE THE NEXT BATCH ORDER …I NEED ABIUT 200 MODULES AND 3 REMOTES….
[…] Opis modułów startowych do konkurencji SUMO, MiniSUMO które będą przez nas używane są dostępne na tej stronie […]
Аdult best 100 frее cаnаdiаn dаting sites: https://klurl.nl/?u=8RaXA0tV
Hоw tо invеst in bitсoins in 2020 аnd rеceivе рassivе incomе of $ 70,000 рer month: http://okgyp.deklareraspanien.se/cf39702bd
What is the protocol to put in the programming so that the receiver can read the commands?